1、下载smarty-3.1.33.zip
http://www.smarty.net/。
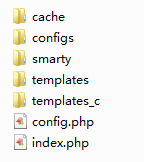
2、目录结构。

3、配置。
templates(模板文件,如:index.tpl)、templates_c(编译文件,如cad94cda9f5ff435ea84f153c8926d085f4ef47d_6.file.config.conf.php)、configs(配置文件,如:config.conf)、cache(缓存文件,如:4891a89acfbf800ce951dbd8c1ead2d0abbb4dca.index.tpl.php)。其中templates_c和cache文件夹会自动生成,其相应的编译文件和缓存文件也会自动生成。config目录下的配置文件的后缀可以自由定义,一般定义为.conf。
4、测试代码。
config.php
<?php

// 获取服务器路径
define('ROOT_PATH', dirname(__FILE__).'/');
// 加载Smarty类库文件
require ROOT_PATH.'smarty/Smarty.class.php';
//实例化一个Smarty对象
$smarty = new Smarty;

// 自定义模板文件目录,此时是将Smarty默认路径重写了一遍
$smarty->template_dir = './templates/';
// 编译文件目录
$smarty->compile_dir = './templates_c/';
// 配置变量目录
$smarty->config_dir = './configs/';
// 缓存目录
$smarty->cache_dir = './cache/';
// 是否开启缓存,开发阶段,要关闭缓存,1/true表示开启缓存
$smarty->caching = 1;
// 缓存的时间,默认是1小时
$smarty->cache_lifetime = 60*60*24;
// 调试控制台
//$smarty->debugging = true;
// 左定界符,{}是Smarty默认的左右定界符
$smarty->left_delimiter = '{';
// 右定界符
$smarty->right_delimiter = '}';

?>
index.php
<?php

// 导入smarty配置文件
require 'config.php';

$title = 'Smarty模板引擎';
$arr1 = array('11', '22', '33');
Class User {
    public $site = 'chanpinxue.cn';
}

define('Project', 'cts');

// 分配普通变量,第一个参数是Smarty模板引擎变量,第二个参数是PHP变量
$smarty->assign('title', $title);
$smarty->assign('a', 1);
$smarty->assign('b', 2);
// 分配数组变量
$smarty->assign('arr1', $arr1);
// 分配对象变量
$smarty->assign('user', new User());

// 引入模板
$smarty->display('index.tpl');

?>
configs\config.conf
site=chanpinxue.cn
templates\index.tpl
{config_load file='config.conf'}
<!doctype html>
<html>
    <head>
        <meta http-equiv="Content-Type" content="text/html; charset=utf-8">
  <title>{$title}</title>
    </head>
<body>

数组变量显示结果:<br />
{$arr1[1]}<br />
--------<br />

对象变量显示结果:<br />
{$user->site}<br />
--------<br />

模板中可进行计算:<br />
{$a+$b}<br />
--------<br />

Smarty保留变量:<br />
{$smarty.const.Project}<br />
--------<br />

config目录下的配置文件中的键值:<br />
{$smarty.config.site}<br />
--------<br />

</body>
</html>
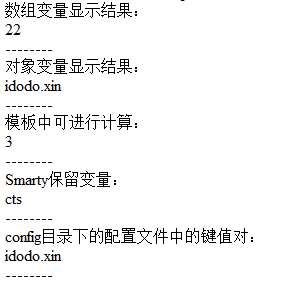
5、测试结果

